
Welcome
to my article series about my experiences in the licensing market and
my process. I will publish new articles on 1-2 weekly basis. This weeks
post is a short insight into my process when coloring.
Coloring is a very complex and
intuitive process for me. It took me many, many years to find my “direction” or
coloring style, and I think it will keep on changing as I improve as an artist.
I love animated films and am influenced a lot by these movies when coloring my
comics and illustrations.
I barely ever color outside of
the computer. I recently picked up watercolors, and I like to use
Copics & Aquarell-pencils from time to time (those watercolor-like pencils that can be
smudged with water), but Photoshop offers me the flexibility I need and like.
My favorite part about Photoshop is the option to work in layers, which is very
important to keep control. If you translated this system into traditional
media, you’d put the line-art on transparent paper, put more transparent paper
with colors beneath, and the background on another underneath all the others.
Traditional animation used to be made like this.
In Photoshop, I do the same; I
have my cleaned up line art with all white pixels removed on one layer. I
create another layer for solid colors on top. And many more: A layer with
shadows (I would literally draw my shadows in black, multiply it on top of the
art and reduce opacity so the colors underneath would appear as darker versions
of themselves), layers for highlights, layers for texture effects, light
effects, etc. – this can get crazy, and make file-sizes super big, but also
grant you the opportunity to keep full control over the art.
With this technique, I was
able to imitate the coloring style of animated movies (I loved coloring my
outlines as well). For shirts, however, I had to completely re-think the
coloring process.
Coloring for shirts
Many shirts are produced via
screen-printing (which is changing too at the moment, more and more companies have switched to digital printing). “Screen printing is a printing technique whereby a mesh is
used to transfer ink onto a substrate, except in areas made impermeable to the
ink by a blocking stencil” (from Wikipedia). This means that when you create a
design for shirts, you need to separate the colors, or design in a way that
color separation will be easy.
 1. Base colors
Here is my approach: I create the clean
line-art, and my lines are all closed. The line art is a separate layer in my
Photoshop file, and all white is removed from it (everything but the lines is
transparent). Underneath, I create a layer for all solid colors (I call it
“base-colors”) – I use the magic wand tool, set the tolerance really high, and
color in the base colors for my design. These colors can stay on one layer for
now, because it will be easy to separate them later (with the select color
tool).

Things
to pay attention to:
-
Make sure that the line art or any color layer is only
one color by double-clicking on the layer -> set a layer style -> color
overlay -> choose the color you want for this layer. This will make sure
that every single pixel in this layer will be the color you want it to be. 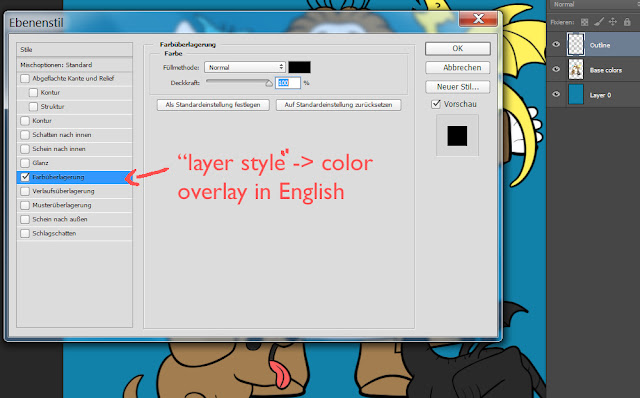

-
When using the magic wand to color in surfaces, it
sometimes leaves a tiny border that isn’t selected (this can cause the effect
that there is a tiny, uncolored area between outline and colored surface). For
this, I have created an action that extends the selection by one pixel. 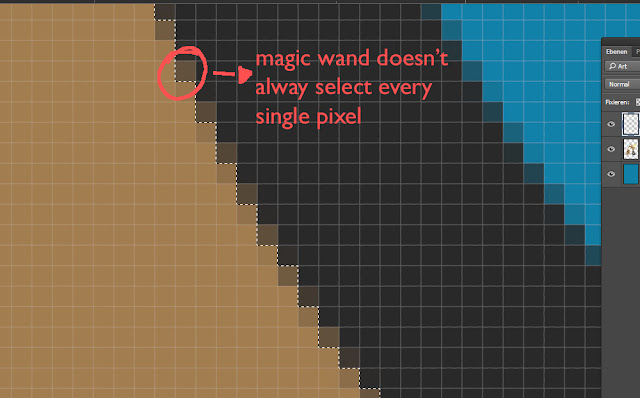

-
Color/ink the file in a large format – I always choose
at least 300 dpi as my resolution with a size of around 4000 x 4000 pixel. You can always down-size, but never the opposite.
-
Keep more than one version of your file – whenever I
am insecure if my next step could fuck up the whole file, I save it as a new
version.
2.
Gradient colors
So, the next part might sound a bit confusing – it
would be far easier to show you what I’m talking about (maybe I’ll be able to
create a video one day) but I’ll do my best in the written format. For the next
step, you can create the illusion of more depth/color with gradient layers. You
can see the difference between solid/gradient in the image below. 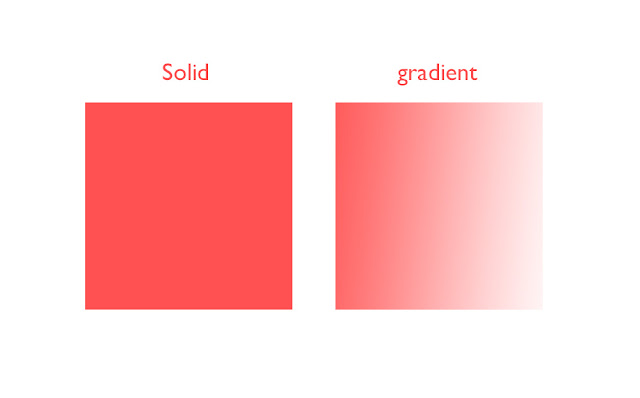

The problem with gradients is, that they don’t work
for screen-printing, which is why you turn them into “halftoned layers” before
submitting them for printing – but more about this in another chapter. In the
image below you can see how gradients have improved the depth of my design, as
well as creating the illusion of more color. In reality, this design has around
six colors, but with gradients it appears to have more.

I accomplish this by creating a new layer for each
color I want a gradient of. For example, if I want to create the illusion of
depth, I decide on a color to darken all colors underneath. If I want to create
skin-color, I use white as a base for the faces of characters, and use a
gradient/textured layer of red on top to create skin color. I can even use two
colors to mix a completely new one: Use blue as a base color and sprinkle
textured/gradient yellow on top, and you’ll get a kind of green. This form of
“mixing” can be a bit risky in the printing process and might not get you the
exact result you are hoping for – but when you’re stuck because you need more
colors for your design, consider mixing them just like you’d mix colors when
painting (you only need blue, yellow and red to mix almost ALL other colors). 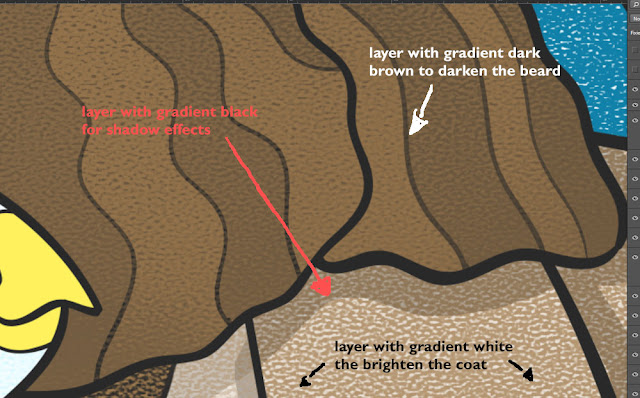

Creating the
gradients
Now, the process of creating the gradients is a bit
different for me each time. The most important step, as mentioned before, is
creating a new layer on top of your solid base-colors for each gradient color
(and never merge different colored gradients -- NEVER!!!). Let’s take the
example of creating a dark-colored gradient layer to create the illusion of
shadow on top of the character. I usually paint in the shadow as a solid color.
Then I use a textured brush with 20 – 50 % opacity to erase to make the base
colors pop out underneath (I am creating a darker version of the base colors
everywhere). Textured brushes are a very
important tool for me. I have bought mine from this website:
http://www.kyletwebster.com/ and
http://frenden.myshopify.com/products/real-photoshop-pencil-brushes ) My
favorite brush to use to create the “texture effect” is Pencil Real 6B by
Frenden).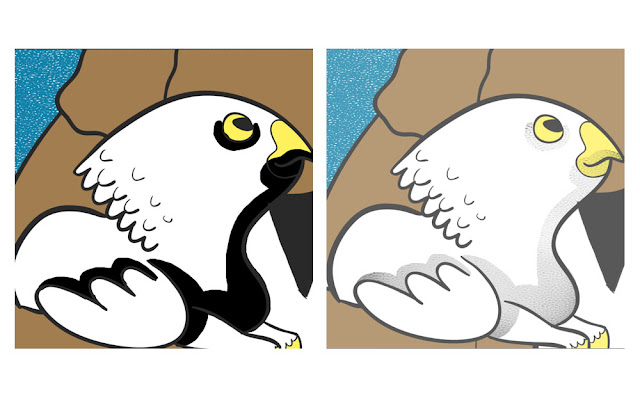

It can become quite challenging to keep track of the
layers – but all of this comes with experience and time. I change my process
all the time, but in essence it stays the same.
Working without
gradients
I know some designers who do a perfect job with only
using solid colors for their designs. The positive thing about only using
solids is that there are fewer surprises when the design is printed (fewer
things can go wrong and the result is more direct). It also forces the designer
to transport their idea with fewer colors. For example, I can see sometimes
that my technique makes my designs too busy. Check out walmazan (bottom image) and spiritgreen’s work (top image) for example:
They use very few gradients/halftones in their designs and accomplish a very
clean look. So consider that. ☺ 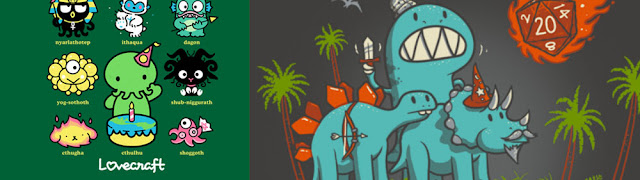


Things
to pay attention to:
-
Keep the gradients layers for each color separated
-
Save more than one version of the file (and maybe use
dropbox.com – if you accidently save & close a version of the file with all
layers merged, or downsized, dropbox saves “old versions” of your file. I have
more than once saved my ass this way).
-
Get familiar with textured brushes. There are lot of
tutorials out there on how they work. One of my favorite tutorial is in the
book/e-book “Digital Painting
Techniques”
2 comments:
Hi! Great articles! Looking forward to read the halftones one! ;)
Thanks! Man, I really need to publish the next article, thanks for reminding me :D
Post a Comment